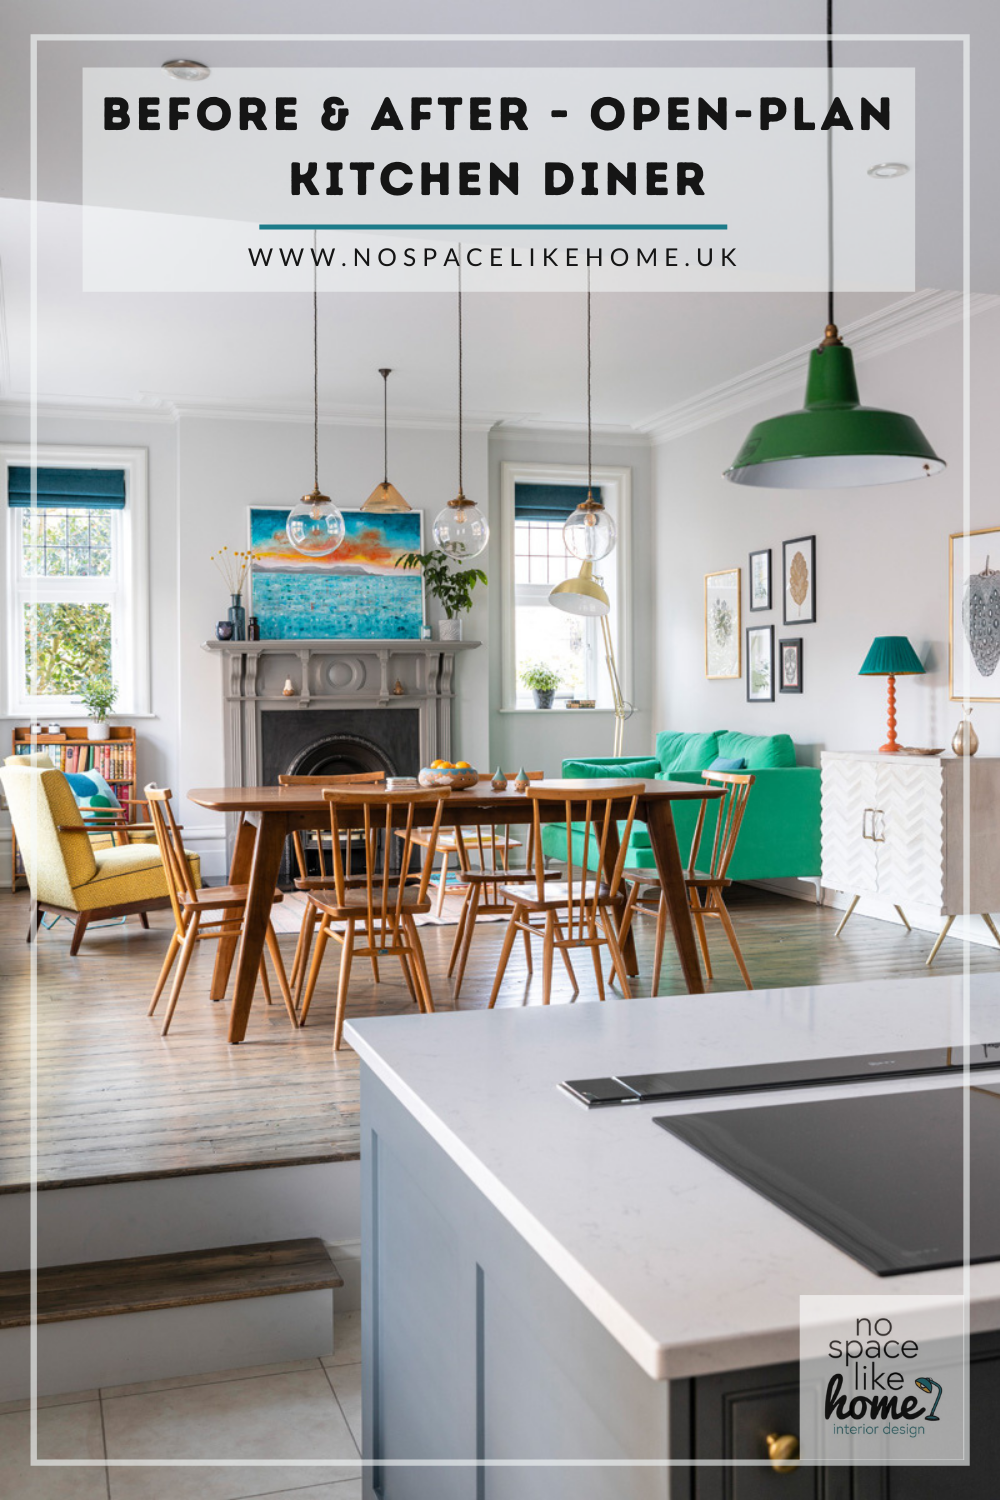
Our Open-Plan Kitchen Diner - Before and After

Last month, I told you all about how we restored our master bedroom and created a new en-suite. The kitchen-diner was the last, and biggest, part of our house renovation.
This was the dining room before we moved in (estate agent photo):
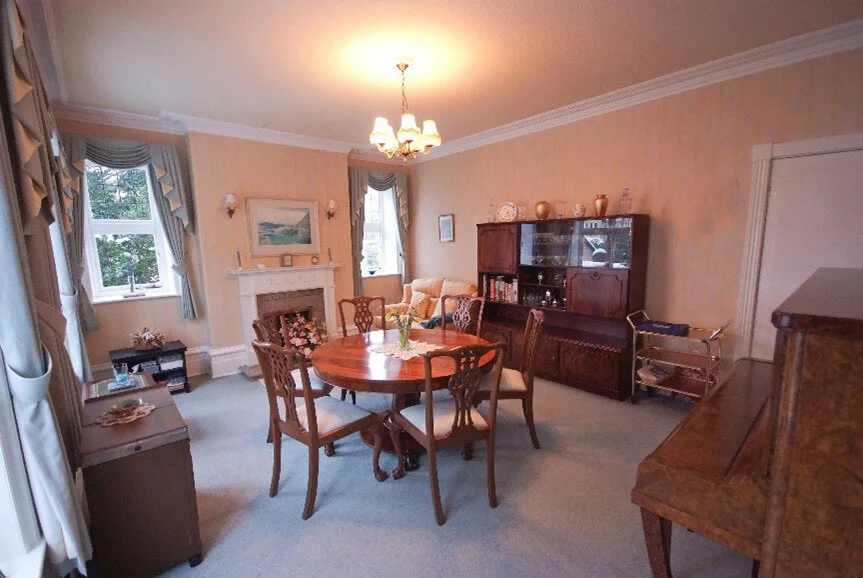
At different times during the renovation, we’d used this room as a living room, a playroom, a bedroom and a store room/dumping ground so it was looking a little worse for wear.
And this was how the kitchen looked when we moved in – see the boxed in beams at the far end? That’s where the pantry and scullery were originally:

“Hmmm, dated but tidy,” I bet you’re thinking? Not by the time we’d finished with it! By then, the fridge and cutlery drawer doors had fallen off, the dishwasher had packed in and we had three sofas stored in there.

The kitchen just before the fridge door fell off (with a very stylish homemade latch keeping it closed). The photo is rubbish but let’s be honest, nothing could make this look good.
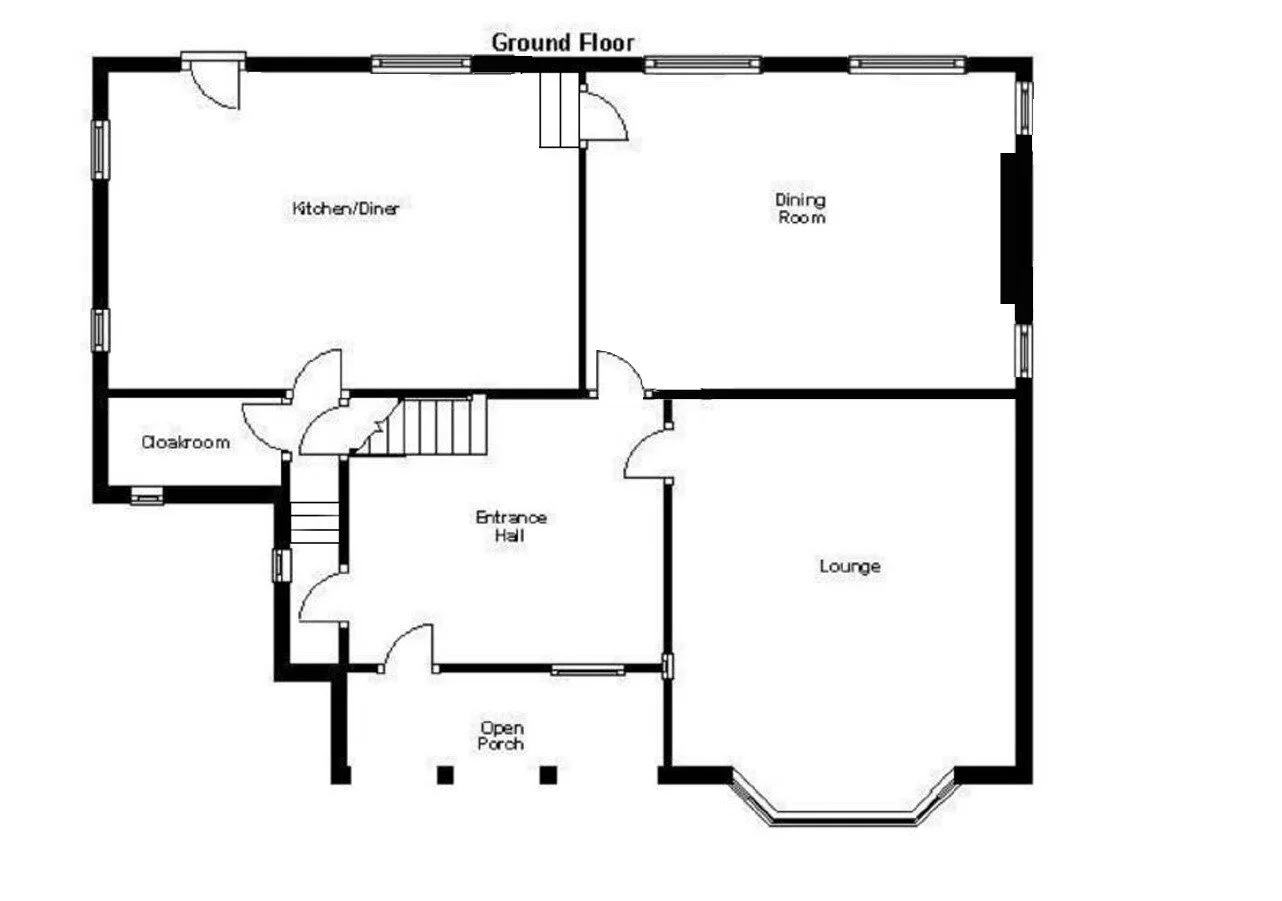
The Layout
Here’s the original ground floor plan (by the estate agent). Our house is a little quirky, full of interesting angles and split levels. There were a few steps between the kitchen and dining room (in Edwardian times, the kitchen was sometimes slightly lower than the dining room because that was where the servants worked):
So, after living in it for three years, the problems we found were:
The back door opened straight into the kitchen where there was no storage for coats or shoes.
The kitchen was big enough for a dining table so we only used the dining room for “special occasions”, i.e. Christmas
The washing machine was in the kitchen with no storage for laundry and no room for a tumble dryer. The old creel / clothes airer (which I love) was hanging in the middle of the kitchen. And because the washing couldn’t be hidden away, I often found myself in situations like this when I needed to wash cuddly toys:

A split level home can be tricky to work with and there were so many doors and windows in here so this room needed very careful planning. We decided to build the wall back up where the pantry and scullery had originally been, to create a utility/boot room with plenty of shoe and coat storage.
We always knew that we wanted the kitchen to be an open-plan space - a family room where we could spend loads of time together - but we needed to make sure that we came up with a split-level kitchen diner design that worked. We eventually decided to knock through between the kitchen and dining room to create a large open-plan kitchen with three zones - a kitchen on the bottom level, and a dining zone and living space at the top. The kitchen floor level would be raised so there wasn’t as much of a drop between the kitchen and dining / seating area. We also decided to block up the door from the kitchen to the cloakroom area which left us with a nice space for an L-shape kitchen and good sized kitchen island. A great open plan layout for day-to-day life and for entertaining.

Work Begins
Before work began, we moved in with my mum and dad who live about five minutes away. I was happy as Larry – school pickups taken care of, meals cooked, wine on tap. We’re very lucky we had the option of moving out while the builders were in (actually it was so comfy there, we stayed for three months until the very end of the project). We got a structural engineer in to do the calculations and it needed two RSJs because we were removing both a wall and a chimney breast. It created quite a mess.

Acrows up ready.

Goodbye load bearing wall!

New floor and partition wall for the utility room being installed.

New ceiling going up in the kitchen area.

The boys on a site visit.
Now on to the real low point of the project. Because the space is split level, the ceiling heights between the top and bottom levels are different. We had to decide whether to put the supporting RSJs under the kitchen ceiling (meaning the ceiling would either have to be lowered by about 20cm or we’d have a boxed in beam on show) or inside the kitchen ceiling (meaning the ceiling could stay at its existing height). If we went for the second option, that would mean that the needles (the things that support the wall before the beam goes in) would have to go through the walls above, causing considerable disruption to the already renovated and decorated boys’ bedrooms. Of course, we went with option 2, which meant they were totally ruined (yes, I cried):

George’s room

Jack’s room
Interior Design Scheme
I cheered myself up by getting on with the fun bit – finalising the room design! When I’m designing period houses, I’m always sympathetic to the era of the property and I ALWAYS, ALWAYS restore or reinstate original features. If you haven't seen my blog on how to restore a period home, you can read it here. I make the rooms more modern with furniture and accessories but the original features always stay because that’s what makes period houses special. As we’d done in the rest of the house, we decided to restore the floorboards and I sourced an original fireplace and original radiators. We’re really lucky that we still have the original windows and doors which add so much character.
The colour scheme for this room started with the sofa. I’d come across Perch and Parrow’s Paul sofa in their Wye Valley fabric and it’s such a beautiful emerald colour. I went for a green and blue scheme with orange and brass accents. This room has both north and east facing windows so apart from in the early morning, the natural light is cool. I kept the walls neutral in Little Greene's French grey Mid, which looks much cooler in here than it does in a south facing room. The woodwork is painted a shade lighter, in French Grey Pale.

I also created a 3D visual to help bring it to life:
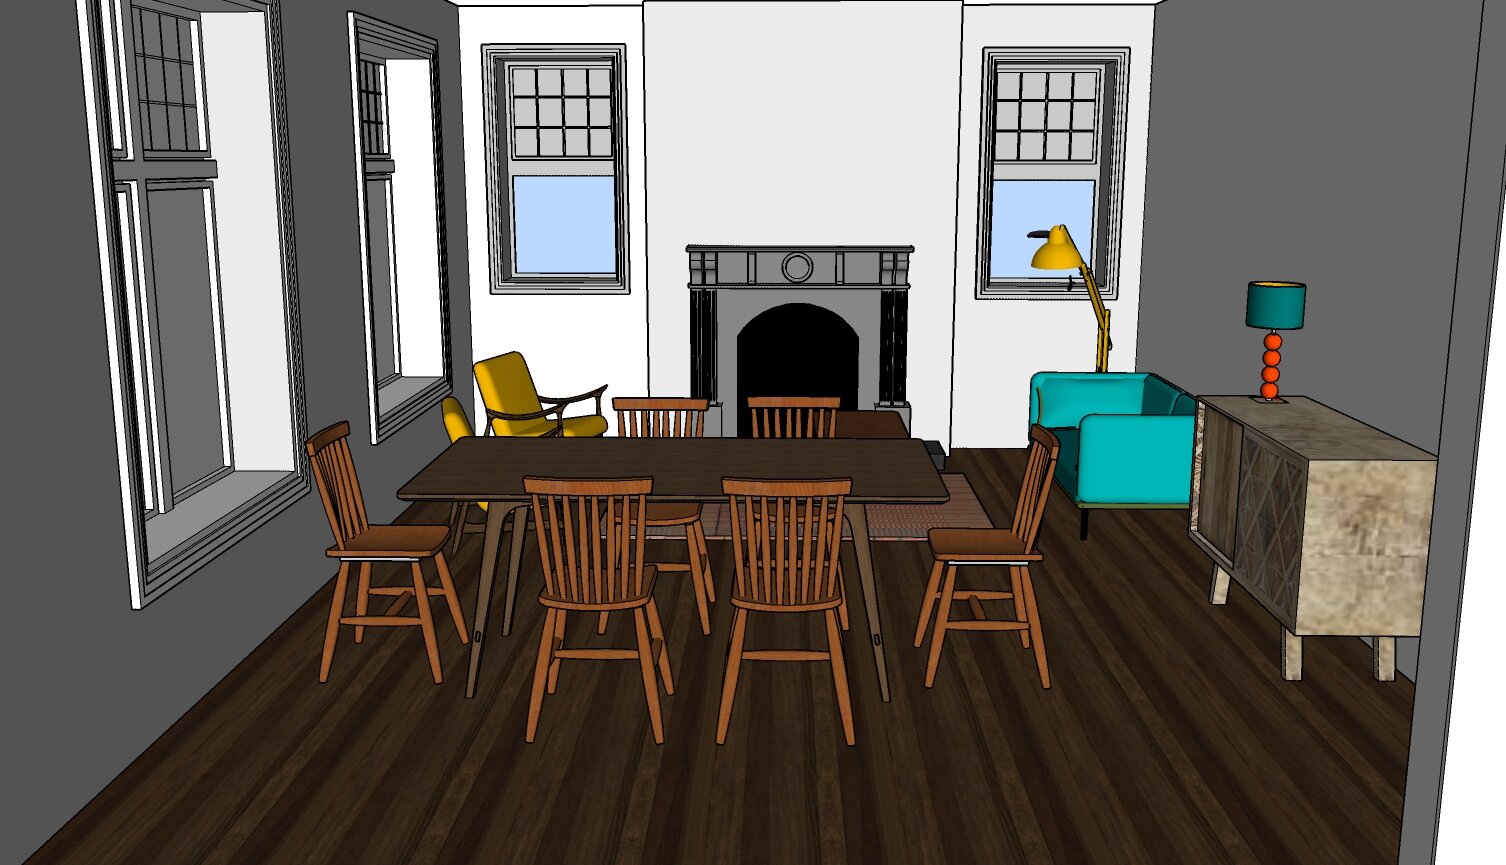
The new open-plan layout
Putting it all back together
And finally it was time to put it back together again (by this point it was mid November and the deadline to get it all done was Christmas – no pressure!):

Also by this point, my eldest boy was hysterical – crying that he never sees us anymore (I was spending most of my time at Screwfix). Oliver was completely exhausted too. So we were really keen to get it all finished and move back in.

I went for classic style shaker kitchen cabinets made and fitted by Ryburn Valley Furniture, a fantastic local company based in Ripponden. We built the partitioning out above the tall units so they look like they’re built into the wall.

I sourced an old fireplace and we restored the original floorboards. You can read about the floorboard restoration process here.
And finally, it was done!
Before:

After

The dining area - I found the original Ercol dining chairs (£35 each – bargain!) on eBay. The beautiful sideboard was from Graham and Green.

Before

The original Ercol coffee table and mid-century chairs in the living area were also eBay finds.

Before

A great sized kitchen space. It has a modern design with a traditional feel - classic cabinetry and modern appliances. In the tall units, we incorporated a tall fridge, two single ovens and a large larder unit with plenty of storage space. If you have a kitchen island, it's a great idea to have the hob facing outwards into the room so that you can talk to people while you cook. I found the fantastic mid century green Revo pendants on Vinterior. For tips on how to hang pendant lights in a kitchen, read my blog post here.

The open shelving provides a light and airy feel and allows us to display lots of things we’ve collected over the years, like the ‘PROVISIONS’ sign which I found in a vintage shop in Hebden Bridge.
I wanted the utility room to have a thrown together look – a bit scullery-ish. We’d converted the basement a year earlier and because we tanked it out, we had to remove some old built-in cupboards and doors, which we re-used in the utility room.

Oliver made the bench and peg rail out of one of the old tongue and groove doors.

I found the old butler sink for £30 on Gumtree. The old cupboard doors give the space a traditional feel.
This open plan kitchen diner project was without doubt the most disruptive part of our house renovation. It’s not easy taking on such a big project when you’ve got three young children, especially when you’re doing most of the work yourselves. And working with older homes, not to mention a split level house, always makes things more complicated. At times, it felt like being on a rollercoaster we couldn’t get off. BUT this multi-functional space has made such a massive difference to our lives. The open floor plan means that we spend so much more time together (Xbox permitting) and it’s such a lovely place to be, with plenty of room for when we have family and friends round.
And was it all done by Christmas? Yep, we moved back in on 23rd December – just in time to put the boys’ rooms back together…

Here’s a list of some of the products we used in case you like the look of anything.
Source list:
Paint - French Grey Mid (walls); French Grey Pale (woodwork); Scree (kitchen units); Lead colour (fireplace surround) – Little Greene
Kitchen units – Ryburne Valley furniture
Kitchen appliances – Neff
Limestone cool flooring – Amtico – bought and fitted by Calder Valley Flooring
Worktop – Silestone lagoon quartz
Sofa – Perch & Parrow
Floor lamp – Barker & Stonehouse
Side table and sideboard – Graham and Green
Orange lamp base and dining room pendants – Pooky
Silt Floor Earth Stain and Lacquer – Mylands
Radiators – Vintage Cast Iron Radiators
And take a look at our latest room reveal in my DIY Budget Basement Renovation blog post!
If you’d like to create an open-plan living space in your own home, for my more ideas, take a look at my blog post about creating an open-plan space that works. I’m based in Halifax, West Yorkshire and I also offer online interior design packages.